We sold one of our lawyer clients a Macbook Air (MBA) 2011 last year around the time when Mac OS X Lion was launched. It came with 120GB SSD, but since some of his office applications required Windows, we installed Windows 7 using bootcamp, using the default 50%-50% split.
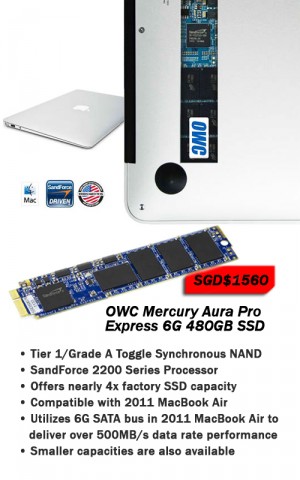
The client called just after 6 months as his Windows partition was running out of space. He wanted to upgrade his MBA to a bigger SSD. OWC Mercury Aura Pro Express SSDs is the only brand that sells MBA mini-SATA SSDs, which are very much different from the normal m-SATA SSDs found in the market. Our client wanted the biggest capacity available – 480GB, which costs US$1,029.99 before tax and shipment. The smallest 120GB version costs a lighter US$234.99 before tax and shipment.
We had a big task ahead to clone all 4 partitions which are on different file systems (Lion Recovery on HFS, Mac OS on HFS, Win 7 hidden boot partition and Win 7 NTFS partition) into the new SSD. The process was made more complicated without an external enclosure for the MBA m-SATA SSDs. The OWC MBA SSD enclosure would only arrive in Singapore 2 months’ time which meant a 2-step cloning process: create a bare metal image of the current disk, and dumping the image back into the new SSD.
We did some research in IT forums, with forum posters giving up in the end. There were 2 issues faced:
1) A cloning software that could create a bare metal image of the entire disk, including all the 4 partitions
2) Re-sizing the partitions to fully utilise the bigger capacity SSD.
Most in the end relied on Time Machine and Windows Backup instead. That would encompass creating 2 separate full backups for each OS, installing a fresh OS on the new SSD, then restoring the backups into each OS. We definitely couldn’t afford the time going down this path, as we needed to complete the job within a Saturday morning. We decided to test all the cloning software we had.
We ran the tests on a Macbook Pro, setting up a similar environment with Windows 7 in Bootcamp. We started out trying several methods that we are used to, for Windows partitions:
1) Norton Ghost, a cloning software: We couldn’t even start the disk imaging because we could only use the sector by sector disk copy method (due to the unrecognised HFS partitions) and we didn’t have a spare 750GB hard disk needed to match the hard disk size in the MBP.
*That is a method we would like to try another time if we had the spare hard disk.
2) Easeus Partition Master Server Edition 9.1, another cloning software: It did copy just the filled sectors, fitting the disk image into an 80GB hard disk. We then dumped the disk image back into the same internal 750GB hard disk. All the partitions were not recognised properly except the Win 7 NTFS partition. We couldn’t boot into Win 7 either. Obviously, Easeus PM was meant for NTFS/FAT32 partitions only.
*We should have known, as the base boot system for the Easeus Bootable CD was a Windows 7.
It was 11pm and we were exasperated.
After half hour more research and lots of prayers, we found an article successfully cloning a Mac OS X Lion with Bootcamp (http://blog.robbclan.com/2011/10/26/766/) using Clonezilla Live CD. Although the steps were long, we were quite familiar with the lingo after a full day of researching and playing around with the different partitions and file systems.
It looked straight forward and we were able to follow the steps and created a bare metal image of our MBP in an hour flat! The article suggested using the FTP transfer method if we had a Gigabit network. Since we didn’t, we used a USB 2 external enclosure. We still managed to achieve a respectable rate of 1.6GB/min, or 27MB/sec.
Just as a comparison, we could only achieve 18MB/s on Windows transferring a single 10GB file with this same USB 2 external enclosure. We dumped the image back into the MBP and it worked. We could now boot into both Mac OS X and switched to Windows 7. Problem solved!
 Interested? Call us now!
Trackbacks/Pingbacks
[…] Upgrade Laptop Singapore […]
[…] Upgrade Laptop Singapore May5 […]
[…] Upgrade My Computer Singapore […]
[…] Computer Macbook Singapore […]